White doily crochet pattern. Crochet napkins: knitting patterns for beautiful napkins. How to crochet a beautiful New Year's napkin with Santa Claus: a diagram with a description
Good afternoon!
And again about napkins. If last time I presented creative ideas, today I offer you classic very beautiful two-color crocheted napkins with patterns.
In addition, in recent days I have been selecting interesting crochet napkins and posted several new patterns:
- in the corresponding article "",
- as well as a new large one with a simple scheme,
- found a mysterious scheme,
- added a few.
So, who loves to knit napkins and tablecloths, you can look and knit something new.
Crochet pink doily
For this delicate two-color napkin, you will need 10 grams of pink Iris yarn, 5 grams of white Iris yarn, hook number 2.
We start knitting with a white thread with a set of 8 VPs, we close it in a ring.
1st row: 3VP, 19 S1N.
2nd row: 5VP, * 1С2Н, 1 VP *.
3rd row: 4VP, 1S2N, 1 VP, * 2S2N, 1VP *.
4th - 10th rows: we continue knitting according to the scheme with a white thread.
11th - 14th We knit the rows with a pink thread according to the scheme.
The scheme of the napkin is not very clear, but I found only one in the magazine, so I placed another scheme of a similar napkin, in which all the rows are knitted in the same way, only they seem to be repeated twice. By the way, such a white napkin is also very effective, but you can also knit it with the addition of pink yarn.

I continue the description according to scheme 1 for a pink napkin.
11th row: fasten a pink thread into an arch of 3 VPs of the 10th row, 20VP, connect the 20th loop with the 8th, 7VP, RLS into an arch of 3 VPs of the 10th row, * 9VP, RLS into an arch of 3 -x VP of the 10th row, 19VP, connect the 19th and 7th loops, 7VP, RLS into an arch of 3 VPs of the 10th row *, 9 VP, finish with a connecting column.
12th row: 1 connecting post for the transition to the arch of 6 VPs (the beginning of the loop) of the 11th row, 1VP of lifting, 4SBN to the arch of 6 VPs of the 11th row, 17S2N to the loop, 5SBN to the arch of 6 VPs 11th row, * 11 RLS in the arch of 9 VPs of the 11th row, 5SBN in the arch of 6 VPs of the 11th row, 17S2N in the loop, 5SBN in the arch of 6 VPs of the 11th row * , 11СБН in an arch of 9 VPs of the 11th row, finish with a connecting column.
13th row: connecting posts for the transition to the 1st S2N of the 12th row, 4VP lift instead of the first S2N, 1VP of the arch, * 17S2N, between S2N by 1 VP, 2VP of the transition, 1SBN in the 6th RLS of the arch from 11 RLS of the 12th row *, 2VP, connecting column with the top of the first C2H of three VPs.
14th row: connecting posts for the transition to the 2nd C2H of the 13th row, 4VP of lifting instead of the first C2H, 1VP of the arch, * 14 C2H, between the columns of 1VP *, finish with a connecting column at the top of the first C2H of their 4 VP.
15th row: fasten a white thread at the top of the second С2Н of the 14th row, * 4VP (2VP instead of the first С1Н, 2VP - arch between С1Н), * 13С1Н, between the columns of the 2VP arch *, 2VP, finish with a connecting column at the top of the first С1Н from 2VP.
16th row we knit with a pink thread: connecting columns to the top of the first C1H of the 15th row, 1ch lift instead of the first sc, pico from 3ch to the top of the first c1h of the 15th row, 2sc into the arch from 2 ch of the 15th row, * 1sc to the top С1Н of the 15th row, pico, 2СБН in an arch of 2 VPs of the 15th row *, 2VP, finish with a connecting column in the first RLS of 2 VPs.
Additionally, decorate the napkin with knitted flowers with leaves.
You can use the following scheme:

Crochet green doily

Materials for a two-color napkin with predominant green: green and white Iris yarn and hook number 2.
Knitting such a napkin consists of several parts.
Part A.
First, we knit a ring in two rows of green.
In the 3rd row we attach a white thread and knit the 3rd - 10th rows in a circle according to the scheme.
Separately, with a green thread, we knit 12 leaves according to the scheme in reverse rows and attach them in the process of knitting to each other and to the round white part of the napkin.
Knitting a leaf
We collect 9 air loops.
- 1st row: 7СБН (we knit the first column on the 3rd loop of the chain), 4CH, then we turn knitting and we knit 6СБН on the same chain on the other side.
- 2nd row: 2CH, 5СБН under each column of the previous row and 2СБН under the arch of air loops, 3VP, and in the reverse order: 2СБН under the arch of air loops, 6СБН under each column of the previous row. One column of the 1st row was not knitted.
- In the 3rd - 10th rows, knitting is similar to the 2nd row. See the diagram for the location of the columns in relation to the previous row: in each row, the number of columns increases by one, while the column of the previous row is not tied on the outside of the leaf.
In the 10th row, between the two halves of the leaves, not 3, but 1VP.
Separately, we knit 12 green circles, attaching them to the leaves.
Part B.
We knit a green transverse path according to the scheme, attaching it to the leaves and circles.
Part C.
We attach a white thread and in the 11-12th rows we finish knitting a napkin.
If you like two-color crochet doilies, write in the comments.
Yulia Vyrskaya sent her wonderful work, she even crocheted 2 such beautiful two-color napkins and made adjustments to the description of knitting, since in the process of knitting it turned out that the magazine description somewhat did not match the photo of the napkin. I am very grateful to Julia for her attentiveness and for sharing her experience with us.
It is always a pleasure to please loved ones and do something new for your own, because they create a special atmosphere of warmth and love. Crocheted napkins have always been the decoration of our grandmothers' apartments, they also find their response in. Today, the craftswomen of the editorial site will share simple and beautiful schemes with a detailed step-by-step description, it remains to stock up on strings and start the exciting process. Ours will inspire you to a completely new kind of needlework, which is available not only to experienced knitters, but also to beginners who love handicrafts.
It is always difficult for novice craftswomen to take the first step and decide on the scheme and choice of template. At first, the symbols resemble a Chinese letter, but once you knit one napkin, this type of needlework will become a new hobby for many years.
There is a huge variety of techniques that are constantly supplemented thanks to the ideas of craftswomen. You can knit napkins of any shape and size using a non-separable manufacturing method, or combine several motifs into one. The following techniques are especially popular.
| Illustration | Crochet technique |
 | Loin - alternation of empty and filled cells. |
 | Vologda lace. |
 | Bruges lace. |
 | Irish lace. |
 | Napkins connected from separate motif parts. It can be geometric shapes combined into one delicate canvas. |
Recently, crocheting napkins has become not only the favorite work of craftswomen, but also the main source of income for many. They sell their works of art around the world thanks to the developed network of the Internet. Exquisite things become a wonderful gift for women of any age. Having mastered different knitting techniques, you can start making garments and larger items, for example, or.
If you're inspired by handiwork, we suggest starting your collection with simple napkins, and our step-by-step guide with photo descriptions will help you understand complex schemes.

Master class on knitting a simple openwork crochet napkin
It is better for novice craftswomen to master skills from simple jewelry, master simple ones, and only after that move on to more complex patterns. We will knit the first flower-shaped napkin from 9 petals.
For work we need:
- white cotton yarn;
- hook 1.6 mm.
Legend:
- SS - connecting column;
- RLS, StBN - double crochet;
- CH - double crochet;
- NZ - unfinished column;
- VP - air loop;
- PSN - half-column with a crochet.
Let's get to work.
| Illustration | Action Description |
 | Fasten the first loop, dial 5 VP, insert the rod into the first and finish the SS. |
 | 1 row Dial 3 ch lift + 2 ch, yarn over, insert the hook into the ring and knit CH. Repeat 7 times: 2 VP, hook in the ring and CH. In total, 9 columns should be obtained, the first 3 VPs are considered a separate CH. |
 | 2 ch, insert the hook into the third ch of the lift and finish the sl-st. |
 | 2 row Insert the rod into the arch and knit the SS, 1 VP of lifting, insert the hook into the arch and knit RLS, 2 VP + yarn, knit CH in the arch, 2 VP in the arch, knit RLS. Rapport repeat in all arches. |
 | 3 row Insert the hook into the top of the sc, knit the sl-st, insert the hook under 2 ch, knit the sl-st, insert the hook into the column and knit the sl-st, 1 ch, insert the hook into the top of the column and knit the sc. |
 | 4 row Dial 4 VP, insert the hook into the top of the column and knit RLS. Repeat knitting along the entire diameter of the napkin. At the end, insert the hook into the top of the column to finish the SS. |
 | 5 row 1 VP, insert the hook under the arch and knit RLS. Yarn over and knit in a CH, repeat 4 more times. Insert hook into arch and knit sc. Repeat all steps with all arches. |
 | Knit a row and insert the hook into the sc of the previous row, finish with a sl-st. |
 | 6 row SS first to the first, then to the second peak, then 3 VPs of the ascent. Rapport: yarn over, knit CH to the next vertex. Yarn over again, knit CH in the next loop. 2 VP, yarn over, insert the hook into the top of the RLS and knit the NC. Yarn over, hook to the top of the sc, knit the NS and combine all the loops. 2 VP, skip one tip and insert the hook into the next. Repeat all steps around the circle. |
 | Knit a row, insert the hook into the third loop of the lift and finish with a sl-st. |
 | 7 row 3 VP lifting. Rapport: 3 VP, yarn over, hook to the top of the combined columns and knit CH. 3 VP, hook to the top of the central column and knit CH. Knit the whole circle, insert the hook into the third loop of the lift and knit RLS. |
 | 8 row 3 VP lifting. Rapport: yarn over and knit CH in the same loop. Yarn over and knit CH in the same loop. Cast on 4 ch, yarn over, hook at the top of the column, knit CH. Repeat until the end of the row, insert the hook into the third ch of the lift and finish with a sl-st. |
 | 9 row 3 VP lifting. Rapport: yarn over, knit SN at the top of the next column, yarn over, knit RLS at the top of the next column. 5 VP, yarn over, hook to the top of the next column of CH. You should get 3 CH, a chain of 5 VPs, SN and a chain of 5 VPs. To close the row, insert the hook into the third VP and finish with the sl-st. |
 | 10 row 3 VP lifting. Rapport completely repeats the previous row. |
 | 11 row 3 VP lifting. Rapport: yarn over, knit 2 SNs in the same VP. Yarn over, knit CH at the top of the next column. In the third column, knit 2 CH. 4 VP in CH. Repeat until the end of the row, cast off the sl-st row in the third loop of the ascent. |
 | 12 row 3 VP lifting. Rapport: yarn over, hook at the top of the column, CH. 2 VP, yarn over, knit CH to the top of the next column. 3 VP, yarn over, knit CH in the same vertex. 2 VP, yarn over, knit CH in the next column. Yarn over, knit CH to the next vertex. 4 VP, yarn over, knit CH in a column. 4 VP. Further, all actions are repeated to the end and are closed in 3 VP of lifting the SS. |
 | 13 row 3 VP lifting. Rapport: yarn over, hook to the top of the column and knit CH. 2 VP, yarn over, in an arch of three VPs, dial 9 CH. 2 VP, yarn over, knit CH in the next column. Yarn over, to the top of the next St, perform CH. 3 VP, yarn over, stretch CH in a column. 3 VP. Repeat to the end, finish the SS in the third VP of the rise. |
 | The drawing at this stage should be clearly visible. |
 | 14 row 3 VP lifting. Rapport: yarn over, hook to the top of St, knit CH. 4 VP, yarn over, rod to the top of the first of nine columns, knit CH. In the second column, knit two CHs. In the third column, knit one CH. 3 VP, yarn over, hook in the fourth column, knit CH. Yarn over, hook in the fifth stitch, knit two CHs. Nakid, CH to the sixth peak. 3 VP, yarn over in the seventh column, knit CH. In the eighth column we knit two CHs. In the ninth column, knit one CH. 4 VP, knit one CH at both vertices of the following columns. 2 VP, yarn over, knit CH to the top of the column. 2 VP, yarn over, knit CH first in the first, then in the second top of the columns. 4 VP. Repeat all actions until the end of the row, close the SS in the third VP. |
 | Rapport 14 rows. |
 | 15 row 3 VP lifting. H, rod to the top of the column, CH. Rapport: 3 VP, knit RLS in the arch. 3 VP, hook in the next arch, StBN. 5 VP, hook in the next arch, RLS. 3 VP, insert the hook first into the first column, knit StBN, then repeat with the second column. Yarn over, insert the hook through one St into the next pair, knit one CH with each vertex. |
 | Rapport 15 rows. |
 | 16 row Insert the rod into the top of the column, knit the SS. 1VP lift, knit RLS in the same column. Rapport: 3 VP, knit in the first arch of RLS. 3 VP, hook in the same arch and knit RLS. In the next arch: 3 VP knit StBN, 3 VP knit StBN. 3 VP, hook in the next arch, RLS. 2 VP, yarn over in the same arch, knit NC, yarn over, knit the second NS in the same arch, combine all the loops. |
 | 3 VP, insert the hook into the first loop, knit a connecting column. |
 | Nakid, knit NZ in the arch. Yarn over and knit NC again, close the loops. 2 VP, knit in the same arch RLS. Repeat all actions of this row according to rapport. Knit a row, insert the rod at the top of the single crochet, knit the SS, pull out and cut the thread. |
 | Here is such an openwork napkin should be the result. |
Napkin "Bright sun"
We will have the next master class only with a diagram and a step-by-step description. We will knit a napkin in the form of a sun with a diameter of 15 cm, for which we will need yarn and a hook according to the thickness of the thread.

In the process of work, it is necessary to adhere to the scheme, which describes in more detail the combination of loops and the marking of the columns.
Dial 8 VP, combine them into a ring.
- 1 VP lift, 16 St BN, finish the SS row.
- Rapport: 1 PSN, 5 VP. Repeat 8 times.
- Arch: SS, 5 CH, 2 VP. Repeat 8 times, finish the SS row.
- 2 CH, 3 CH, 2 CH, 2 VP. Repeat 8 times.
- Skip the 2nd and 6th columns, then knit the rapport as follows: 5 CH from one tip, 3 VP, under 2 VP of the previous row, tie 1 CH, 2 VP, 1 CH. Repeat 8 times and finish the sl-st row.
- Under all the arches from the VP, tie 1 CH, 2 VP, 1 CH, 3 VP. Finish the SS row.
- Knit SS under the arch, then knit rapport: 1 CH, 3 VP, 1 CH, 3 VP. Skip one arch and repeat knitting until the end of the row. Finish row 1 VP, 1 PSN.
- Rapport: 1 sc under the arch, 5 SN under the next arch. Repeat to the end, finish the SS row.
- Pull out the last loop, cut and fasten the thread.

Step-by-step description of the pattern "Pineapples"
The delicate and beautiful “Pineapple” pattern is often used by needlewomen not only in knitting napkins, but also in openwork blouses, so any craftswoman should learn to understand this pattern. Let us consider the step-by-step description in more detail, by default, each row of the pattern ends with SS, and at the beginning, instead of 1 CH, three VPs are knitted for lifting.
- Connect 6 VP into the SS ring. Knit 3 VP and 19 CH.
- 1 VP, rapport: 3 VP, 1 RLS knit in the next loop. At the end, knit 1 sc in the first VP.
- 1 VP, rapport: 5 VP, knit 1 RLS in an arch. At the end, knit 2 VP, 1 CH in the first VP.
- 1 VP, rapport: 7 VP, knit 1 RLS in an arch. At the end, knit 3 VP, then with a column with two crochets in the first VP.
- Knit No. 5 and No. 6 by analogy with No. 4.
- Rows 7 and 8 knit as follows. 1 VP, rapport: 9 VP, in an arch 1 RLS. Finish row 4 ch, 1 column with 3 crochets in the first ch.
- 9th and 10th rows: 1 VP. Rapport: 11 VP, in an arch 1 RLS. Finish the row with 5 ch, 1 column with 4 crochets in the first ch.
- In the 11th row, knit 2 SS to the arch, then rapport: 3 VP, 1 CH, 2 VP, 2 CH, 6 VP.
- 12 row begins with rapport: in the first arch under 2 VP, tie 3 VP, 1 CH, 2 VP, 2 CH, 6 VP. Then in the second arch 7 CH, 6 VP. Repeat until the end of the row.
- At the beginning of the 13th row, knit 2 SS to the arch, then repeat the rapport in each arch: 3 VP, 1 CH, 2 VP, 2 CH, 6 VP. Next, the transition to the 7th column of the previous row, it is necessary to knit 6 times (1 CH, 1 VP), then 1 CH, 6 VP. Repeat the entire rapport to the end of the row.
- At the beginning of the 14th row, knit 2 SS to the arch, then the scheme of work is as follows: 3 VP, 1 CH, 2 VP, 2 CH, 2 VP, 2 CH, 6 VP, 1 RLS under 1 VP. Next, you need to repeat 3 VP, 1 RLS 5 times and finish the rapport of 6 VP.
- 15 row: two SS, rapport: 3 VP, 1 CH, 2 VP, 2 CH, 3 VP, knit 2 CH under 2 VP, then continue the row 2 VP, 2 CH, 6 VP, 1 RLS under VP, repeat 4 times 3 VP and 1 RLS, 6 VP. Repeat until the end of the row.
- 16 row: two SS. Rapport: 3 VP, 1 CH, 2 VP, 2 CH, 9 VP, under 2 VP tie 2 CH, 2 VP, 2 CH, 6 VP, 1 RLS under 3 VP, 3 times (3 VP + 1 RLS), 6 VP.
- The beginning of the 17th row is similar: 2 SS. Rapport: 3 VP, 1 CH, 2 VP, 2 CH, 9 VP, 1 RLS under the arch, 9 VP, under 2 VP tie 2 CH, 2 VP, 2 CH, 6 VP, 1 RLS under 3 VP, 2 times in 3 VP and 1 RLS 6 VP.
- 18 row: 2 SS, rapport: 3 VP, 1 CH, 2 VP, 2 CH, twice 9 VP and 1 RLS under the arch, then 9 VP, under 2 VP tie 2 CH, 2 VP, 2 CH, 6 VP, 1 RLS under 3 VP, 3 VP, 1 RLS in an arch, 6 VP.
- The beginning of the 19th row is similar to 18. Rapport: 3 VP, 1 CH, 2 VP, 2 CH, 3 times 9 VP and 1 RLS under the arch, 9 VP, 2 CH under 2 VP, 2 VP, 2 CH, 6 VP, 1 RLS under 3 VP, 3 VP, 6 VP.
- We start the last row with two SSs, then according to the scheme: 3 VP, 1 CH, 2 VP, 2 CH, then 4 times 5 VP, pico from 3 VP, 5 VP, 1 RLS under the arch. We continue the rapport of 5 VP, pico of 3 VP, 5 VP, knit 2 CH, 2 VP, 2 CH under two VPs.


Conclusion
And in conclusion, we offer you to watch a master class on knitting a simple napkin in just 15 minutes.
Legend:
Work description:
Tie 8 air loops and close in a ring with a half-column. Next, knit according to the scheme. At the end of the work, lightly starch the napkin, smooth it and lay it out on a flat surface until it dries completely.
Knitting pattern:

Napkin №2

Knitting pattern:

Napkin №3

Knitting pattern:

Napkin №4

Napkin with rays.
Openwork knitting.
The size: diameter 55 cm. Materials: Lily yarn
(100% cotton), approx. 60 g white, hook No. 1.25.
Job description: chain of 10
in. close in a circle with the help of the connection. Art.
1st p.: 1 in. lifting item. 15 art. b / n in the resulting ring.
Finish the row with the sole of the connecting column. 2nd p.: 4 c. n. (3 v. p. lifting + 1 v. p.), * 1 tbsp. s / n in the next art. b / n of the previous row, 1 c. n. repeat from * to * 14 times. There are 16 arches in total. Finish the row with the help of the connection. Art. 3rd p.: 5 c. p. (3 v. p. lifting + 2 v. p.), * 1 tbsp. s / n in the next art. s / n of the previous row, 1 ch *, repeat from * to * 14 times. There are 16 arches in total. Finish the row with the sole of the connecting column.
Then continue the work according to the scheme for the 29th row inclusive.
Starch the finished napkin, stretch to size and leave to dry.
Knitting pattern:

Napkin №5

The size:diameter approx. 60 cm
Napkin materials: iris yarn, approx. 75 g pink, hook No. 1.25.
Knitting napkins: a chain of 10 c. n. close in a circle conn. Art. 1st p.: 3 c. n. lift, 4 unfinished, art. s / n, connected together, in the 1st century. lifting point, 6th c. p., * 5 incomplete, Art. s / n, connected together, for 1 p. of the base, in a ring, 6 c. *, repeat from * to * 4 times. There are 8 arches in total. Finish the row with the help of the connection. Art. 2nd river: go to the beginning of the row with the help of the connection. Art., 7th century. n. (1 v. p. lift + 6 v. p.), 1 tbsp. b / n to the next arch from the 6th c. n. of the previous row, 3 c. p., * 1 tbsp. b / n in the same arch from the 6th c. n. of the previous row, 6 c. p, I st. s / n to the next arch from the 6th c. n. of the previous row, 3 c. *, repeat from * to * 4 times. Only 6 times. Finish the row with a connecting post. Next, knit according to the scheme for the 33rd row inclusive.
Starch the napkin, stretch in shape.
Napkin pattern:

OPENWORK NAPKIN SCHEME №6

will always make your home cozier and more desirable for the arrival of guests. It brings us childhood, as if we were visiting our grandmother. In order not to get bored watching TV on winter evenings, knit such an openwork napkin.Size: 54 cm.
You will need:
100 g of white yarn Violet Yarn Art (100% cotton, thread length 280/50 g).
hook No. 1.25-1.5.
Dial 8 air. n. and close in a ring. Next, knit in a circle according to the pattern. At the beginning, instead of st b / n, knit 1 lifting loop. Finish a series of connections. Art. or as shown in the diagram. Continue the pattern on all p. = 16 reports to 4 p., 8 reports to 14 p., 48 reports to 16 p., 24 reports to 19 p., then 16 reports. dry. Starch, iron.
Napkin pattern:

Taken from http://kniti.ru
Napkin №7
The magic pattern of feathers on a napkin is knitted with the help of complex "bumps", which consist of columns with a different number of crochets from 1 to 4.

Crochet napkin pattern:

Napkin №8
Beautiful napkin with a pattern of spikelets.

Scheme

Napkin №9
The napkin pattern is formed by long chains of air loops.

Knitting pattern for napkins

Napkin №10
Airy openwork napkin with flowers

Crochet pattern

Napkin №11


Napkin №12


Napkin №13
In our century, when many functions have been taken over by machines, handmade products are highly valued. The art of crocheting lace is easy to learn, and you can fall in love with it very quickly. You just need to look at the masterpieces coming out of the hands of craftswomen.
It is easiest for beginner craftswomen to learn from ordinary products. For example, it will be easy to create ordinary crocheted napkins with diagrams and a full description.
Many novice craftswomen are very afraid to crochet. But it is precisely such a tool that helps to make beautiful openwork patterns. To be convinced of this, it is worth taking a look at the magnificent napkins, where crochet technology is presented in all its glory. Airy, gentle, completely different - they cannot leave anyone indifferent mood.
A small knitted napkin knits step by step according to the master class easily. Do not be upset if at first it will turn out slowly - in this case, do not chase the result and try to get the most out of the process, repeat MK in stages and knit-knit-knit. As they say, the main thing is to start ...
 Crocheted openwork doily for beginners is the best practice. Firstly, small napkins are most suitable for the first knitted items. Secondly, it is exciting to create them due to the lack of repeating rows, an easy knitting pattern is understandable even for beginners in needlework, and if something is not clear, then you can study the full master class.
You can create a napkin of any size - large or small, give it the appearance of a rectangle, oval, circle, square. In general, beginners in crocheting will see many discoveries, and, most importantly, learn to understand the patterns and buy the materials necessary for work.
by the most stylish and unique knitting pattern crochet can accurately be called "pineapple". It is offered to all novice craftswomen because of its ease of execution and gorgeous result. Creating a napkin is not difficult, besides, the scheme is easy to understand, memorize and create easily. The master class described below will help you create a round napkin, measuring 25.5 by 35.5 cm.
Materials that we need for work:
- The yarn is cotton. It should be thin so that the product becomes light and airy. It is better to take threads of 200 m / 50 grams.
- The hook is thin, best of all - No. 1.4-1.5.
Description of the work process:

Openwork knitting according to this pattern is possible for absolutely everyone and even the first time. The master class is simple, but if difficulties arise, you can watch the video tutorial.
Napkin for beginners
Miniature napkins are good because they are quickly created, and thanks to this they help to perfectly “fill your hand”. We took a fairly common scheme so that even a beginner could handle it.
To create a napkin, we you need to take a hook and thick threads of wool:


In the next arch we will knit eight columns single crochet. So we will continue to work until the end of the row. Let's finish with a connecting column.
Other napkins and schemes for them
 Let's continue crocheting napkins. Schemes and a full description are attached.
With a hook, for example, you can make excellent napkin, the pattern of which resembles a pineapple.
To knit these napkins, you will need AIDA threads and hook No. 1.25.
Knitting napkins should be started according to the patterns from point A. We will knit the pattern around the circumference. The number of loops to be dialed is on the diagram.
Napkin star
Its entire diameter is forty-nine centimeters. In order to make it, you will need: white cotton yarn, about 280 meters, hook No. 1.25 or No. 1.5.
 In addition to such openwork and lace products, you can also knit a very fashionable, modern napkin on the table. To create such a product, you will need multicolor yarn and hook 2.5. Since the napkin is created from two parts, we first knit the first part, then we begin to create the second, and only on the fifth row we need to start connecting these parts.
All the napkins that we dismantled in our master class must be washed after they are completed, and then very gently straighten and stretch otherwise the products will lose their shape.
Good afternoon, dear needlewomen!
Crocheting doilies for beginners is not at all difficult, as it might seem at first glance.
Crocheting is an exciting, exciting activity, especially if you see photos and patterns of very beautiful openwork napkins in magazines, and on the Internet, you just want to knit such beauty with your own hands! Often these ideas are published without a detailed description and it is not always clear how to knit.
Today we will learn how to knit napkins and read patterns using a simple small napkin as an example. I have prepared for you a detailed step-by-step description with a photo.
Crochet napkins for beginners - the choice of yarn
It is best for beginners to use thicker threads (but not very thick) so as not to get tangled in them. For example, acrylic or cotton is a skein, in 50 grams of which there are approximately 240 meters.
The hook is selected according to the thickness of the thread. This is done by trial: if you take a very thin hook, then knitting with thick yarn will be difficult, almost impossible. A crochet with a very large number will turn out to be too full of holes in the napkin.
For knitting a thick napkin, a hook with number 2 - 2.5 is suitable. But, again, I repeat, do not strictly follow what is written. Try it, choose the option that seems more convenient to you.
It is better to start with the simplest knitting patterns.
Small napkins can be used as. White or multi-colored napkins will look good in table setting.
Well, in the future, for knitting openwork napkins, it is better to use thin cotton bobbin threads, such as those used for sewing (No. 0-10). From them, the product will turn out gentle and airy.
The hook in this case should also be taken with the smallest number 0.5 or 1.
You can also knit napkins from thicker cotton yarn such as Iris, Rose and others, the hook will fit with the number 1.2-1.5.
So, how to crochet a doily?
Crochet Doilies Lesson for Beginners
Here is our napkin pattern. I chose a specially small and simple scheme for beginners.
On the corresponding page you can always find those used in diagrams and text descriptions.

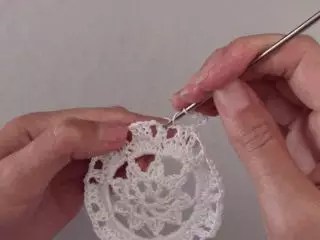
So, let's begin! I will make a description, and you will knit a napkin and ask questions in the comments.
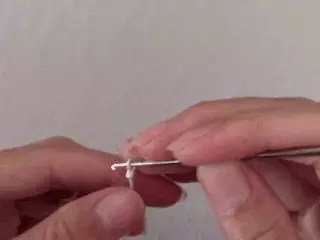
1 . AT napkin swiping begins always from its center: from a set of chains of air loops. (Conventionally designated VP). In the diagram, air loops are indicated as a small loop or a small circle (dot).
For this napkin, we knit a chain of 12 air loops.
Then we connect the first and last loops with a half-column to make a ring.
We knit a napkin in a circle in one direction from right to left.
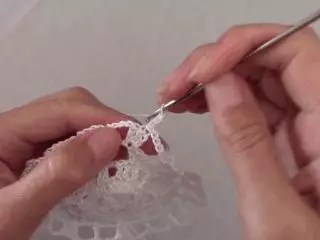
2 . Knitting of each row usually begins with a set of several stitches, this is necessary to raise the row so that it is even, and not beveled and crooked. . The required number of loops is indicated in the diagram.
In this case, in the first row we knit 3 air loops (VP) for lifting.

The icon following the VP in the diagram indicates a column with 1 crochet. But I decided to knit two crochets, so further my description will differ slightly from the scheme. But this is not important, you can knit with one or two crochets. And the designation C2H means two columns with two crochets.

We tie the ring according to the scheme with 32 columns with two crochets. Insert the hook into the ring.

We connect the last column with a chain of 3 air loops (VP), dialed at the beginning of the row, with a half-column (PS).

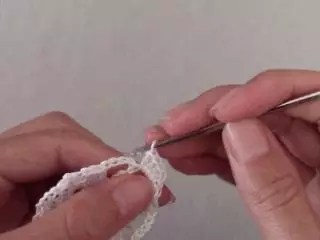
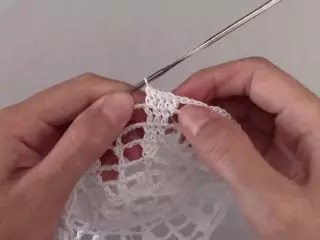
3 . We knit the remaining rows, looking at the diagram.
In the second row: 3 air loops (VP), 4 columns with two crochets (С2Н) in each column of the previous row and so on.
I made a little mistake here and at the beginning of the row I knitted only three columns.


It is not necessary here to connect the last loop of the row with the first, as is usually the case when knitting napkins. Starting from the third row to the 6th in this napkin, the air loops at the beginning of the row perform not only the role of lifting the row, but also are an element of the pattern, i.e. there is a smooth transition from the previous row to the next.

3rd row: we alternate 4 air loops (VP) and 6 columns with 2 crochets (С2Н). We look at the diagram that when knitting the middle 4 columns, the hook must be inserted into the base of the columns of the previous row, and we knit the first and sixth columns, introducing the hook under the chain of air loops of the previous row.


4th row: we alternate 5 air loops (VP) and 8 columns with 2 crochets (С2Н).
5th row: we alternate 9 air loops (VP) and 10 columns with 2 crochets (С2Н).
6th row: alternate
11 air loops (VP),
4 columns with 2 crochets (С2Н) at the base of the columns of the previous row, 11 VP,
skip 2 columns of the previous row and knit 4 С2Н ( remember the notation - four columns with two crochets) at the base of the last four columns of the rapport of the previous row ( rapport - a repeating part of the pattern),


at the end of row 5 VP, we connect the latter with an arc from the VP, connected at the beginning of the row, with a single crochet.

7th row:
* 5 VP,
15 columns with 2 crochets (С2Н) under the arch from the air loops of the previous row ( those. we introduce the hook under the arch from the VP),

single crochet under the arch from the VP of the previous row * .
At the end of the row, knit 6 VP and connect them to the beginning of the row with a single crochet.

Pay attention to the sign * in recording? This means that the rapport knitting described between two * , you need to repeat several times (instead of the word "alternate", which I used in the description of knitting the 3rd-6th rows).
8th row:
a column with two crochets (С2Н) at the base of the first column of the previous row,
pico from 4 VP (in we knit a chain of four air loops, then we connect the first and last loop together with a single crochet, we get a small ring, or rather not even a ring, but a small lump),
For clarity, watch the video tutorial from

С2Н to the base of the third column of the previous row (we skip the second column of the previous row) and so on ( look at the diagram).

In total, you get 8 columns with a pico in between.

a single crochet under the arch from the VP of the sixth row *.
4 .We cut off and fasten the thread, from the inside we carefully hide the tip of the thread, stretching it with a hook under the posts.